Sunday, February 22, 2009

Menu Plan Monday {27}


Breakfasts: Oatmeal or Cereal
Lunches: Leftovers, Tomato Soup or ham sandwiches
Dessert: bollur/cream puffs leftover from Bolludagur.

Monday - Southern Style Chicken and Dumplings
Tuesday - Fish and Chips
Wednesday - Tortellini with Beef and Sun-Dried Tomatoes
Thursday - Meatloaf, 5 Bean Casserole and Coleslaw
Friday - Tuna Salad Sandwiches (Quick Night due to Hockey Game)
Saturday - Pantry Cleanout
Sunday - Magazine Menu : French Onion Soup, Roast Pork Tenderloin with Apples and Cider Sauce, Sherried Sweet Potatoes and Apples, Wilted Greens with Warm Sherry Viniagrette, Baked Apples Stuffed with Dried Fruit and Pecans

See previous Menu Plans at Candy Hearts and Paper Flowers

Join Menu Plan Monday over at The Organizing Junkie

Pumpkin Sour Cream Chocolate Chip Muffins

Pumped up Pumpkin

Here I am sitting here wishing I wasn't sick anymore - it has been two weeks!! I wanted very badly to go over to Barb's today (just showing up in all my coughing glory) and say hi and let's make something. But I figured that I would be a good friend and stay home. (But don't friends share? hee hee) But I did want to make something. So I just went to my cupboard and fridge, pulled stuff out and came up with these:


Pumpkin Sour Cream Chocolate Chip Muffins

INGREDIENTS

3 cups Flour
1 1/2 cups Sugar
1 tbsp Baking Powder
1 tsp Salt
1 tsp Baking Soda
1 tbsp Cinnamon
12 oz Canned Pumpkin
1 cup Sour Cream
2 eggs, beaten
1/2 cup Oil
3/4 cup (or more) Chocolate Chips


DIRECTIONS

Preheat oven to 375F.

Combine first six ingredients; set aside. Mix well the remaining ingredients except the chocolate chips. Add the pumpkin mixture to the dry ingredients and mix until all combined. Batter will be thick. Then fold in chocolate chips.

Lightly grease muffin tin and fill each almost to the top. Bake at 375 degrees for 25 minutes.

Makes about 18.
~~~~~~~~~~~~~~~~~~~~~~~~~~~~~~~~~~~~~~~~~~~~~~~~~~

I, like Barb, am a dump cook so I took my time in measuring out what I would dump here, glug there, and shake shake shake everywhere. I think they turned out good, though my taster is off a little still. But my thinking is that if it has sour cream in it, then it HAS to be good. (I have been known to eat sour cream right from the container when rummaging through the fridge for a quick taste of something something. :)

Cheers!
~ Jen

Cream Puffs or Bollur

NOTE: Recipe moved to Candy Hearts and Paper Flowers

I made these for an Icelandic holiday tomorrow called Bolludagur, for details see Candy Hearts and Paper Flowers tomorrow. This recipe makes a choux pastry, pâte à choux, and is translated from metric measurements, I hope it works out for you. This site has pretty good pictures of the process and what it looks like at each stage. This pastry gets it's height from the steam created by the moisture of the batter, if you open the door you will lose that steam and your puffs will fall. This pastry would be the perfect example of why ovens have a light inside and a window in the door.

Cream Puffs

Cream Puffs

INGREDIENTS
Pastry:
1 1/3 cup water
1 stick butter
1 1/4 cup flour
3 eggs

Filling:
1 cup whipping cream
2 Tbsp powdered sugar

Chocolate Icing:
1/2 cup Semisweet Chocolate, chopped
3 Tbsp cream

DIRECTIONS
Preheat oven to 400 degrees
Heat water and butter in small pot until it just comes to a boil
Add flour to the pot all at once and stir until incorporated, continue stirring for 1 minute or until film starts to form on the bottom of the pot (about 1-2 minutes)
Add eggs 1 at a time and combine completely before adding next egg.
This will form a very soft dough that you drop by tablespoonful onto a parchment sheet lined cookie sheet
Cook for 23-26 minutes at 400 degrees until very light golden brown
Do not open the oven to check the puffs or they will fall, use the window to get an idea of color.
After the pastry comes out of the oven let them cool completely before assembling.

Prepare filling by whipping cream until soft peaks form, sift in powdered sugar and whip additional 5 seconds

Place chocolate in microwave for 15 seconds
Add cream, microwave for additional 15 seconds
Mix well, microwave in additional 15 second intervals, if needed until you can stir it until smooth.

To assemble:
Slice open
Top with dollop of whip cream
Dip top in chocolate and nestle on top of whip cream

Saturday, February 21, 2009

5 Bean Casserole

I found a similar recipe a few years ago and have been making it for summer family gatherings. I've changed a few things about it and this is my go to recipe for baked beans. This makes a huge batch, I section it and freeze it in portions. It makes enough for large family gatherings, for just your family at home half it and count on some leftovers. I used garbanzo beans this time since I had some on hand, but they don't get soft so I avoid them for this dish usually.

5 Bean Casserole

5 Bean Casserole

INGREDIENTS
1 lb bacon
1 large onion
2 tsp ground mustard
1 tsp salt
1 1/4 cup cider vinegar
1 1/4 cup brown sugar
2 15 oz cans lima beans, drain and rinse
2 15 oz cans butter beans, drain and rinse
2 15 oz cans kidney beans, drain and rinse
2 15 oz cans navy beans, drain and rinse
2 28 oz cans baked beans

DIRECTIONS
Cut bacon into 1 in pieces and cook in bottom of large stock pot (6-8 quart) and cook until browned
Remove bacon and drain fat, add onion to pot and saute until soft and lightly brown
Return bacon to pot, add ground mustard, salt, vinegar and brown sugar to pot, bring to a simmer
Add beans to pot and simmer for 1 hour or pour into casserole dish and cook in oven for an hour covered, then 30 minutes uncovered at 350.

Friday, February 20, 2009

Cheese Stuffed Shells

I really love Italian cooking. I do NOT love spending all day watching tomatoes boil, though. I found this recipe one day while fiending for ricotta cheese stuffed shells! It is delicious - even my husband likes these, and he is "not so much" with the pasta. When good friends of ours lost a daughter a year and a half ago, I made these in 2 square foil pans so they could just heat up what they would eat at one meal. (I'm a big believer in lots of food when someone passes away!)

The other day I went to Sam's and bought a monster tub of Ricotta and a FIVE POUND BRICK of mozzarella. Had to use them, right?

Cheese Stuffed Shells

INGREDIENTS
Sauce:
1 chopped onion, small
2 cloves garlic, chopped
olive oil
lg can Italian tomatoes, with juice
15 oz can tomato sauce
1 tsp oregano
1 tsp basil
2 tsp sugar
2 tbsp parsley

Cheese Stuffing:
1 lb ricotta
1/4 lb mozzarella, grated
3 tbsp parmesan, grated
1 tbsp parsley
1 egg

20-30 large pasta shells

DIRECTIONS
Sauce:
Saute onion and garlic in oil until tender. Add tomatoes; saute until soft. Break up with a fork or wooden spoon. Add tomato sauce and spices; simmer 30 minutes to 1 hour.

Cheese stuffing and shell assembly:
Combine ingredients and mix well; put in fridge until shells are ready to stuff. Parboil shells about 12 minutes. Drain and rinse in cold water; drain again. Place half of sauce in 13x9x2 baking dish. Carefully fill each shell with cheese stuffing.


Place shells on top of sauce, stuffed side up. Spoon remaining sauce over shells and sprinkle with more grated parmesan cheese. Cover with foil and bake at 375 for 35-40 minutes. If desired, uncover 10 minutes before baking is done and sprinkle with shredded mozzarella.
Serves 4-5


Becca's tip of the day - I have a decorating tube with an open star tip. I load this with the cheese mixture and it is super-easy to pipe the stuffing into the shells with less mess and aggravation! This is the tool I use. Love it!

Welcome Jen!

I've lamented how difficult it can be to make new friends as an adult on my personal blog. About 18 months ago a client was upgrading their accounting software and I spent an awful lot of time on the phone with them getting everything configured and issues worked out. Jen was my primary contact for the upgrade so we talked quite often. I liked Jen and figure we would be pretty good friends, but was a little worried about approaching a friendship since she was a client... and I didn't want to make the situation uneasy if she wasn't interested in a friendship. Thankfully, she asked me to go to lunch about 6 months ago, and we've been great friends ever since!

So, without further delay, I'd like to introduce you to a dear friend of mine, Jen. Jen and Becca also know each other, and while Jen's not quite a few blocks away, nothing is far away in Grand Forks. So we'll all be getting together at least once a month for a dinner to share. My hubby's comment last night is that he and the other hubbies are the ones to benefit from this arrangement. Jen will also be sharing recipes from time to time, so hopefully we'll get a bit more variety here for you.

Wednesday, February 18, 2009

Stuffed Pork Tenderloin

Stuffed tenderloin is easy, yet elegant looking. It can even be assembled quickly on a weeknight. The beauty of it is in the presentation. I used ground mustard because I was serving with a mustard sauce, but feel free to adapt the spices to what you are serving on the side. Be sure to separate the 2 cups stuffing from remaining stuffing to avoid cross-contamination as you are touching the raw meat. I must have washed my hands 20 times so I could touch my camera, see what I do for you.

Tenderloin Sliced

Stuffed Pork Tenderloin

INGREDIENTS
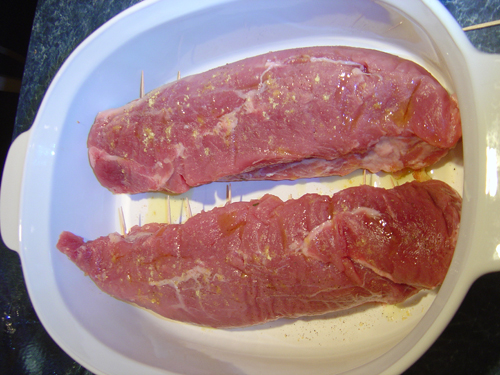
2.5 lb pork tenderloin (this was 2 tenderloins in a pack for me)
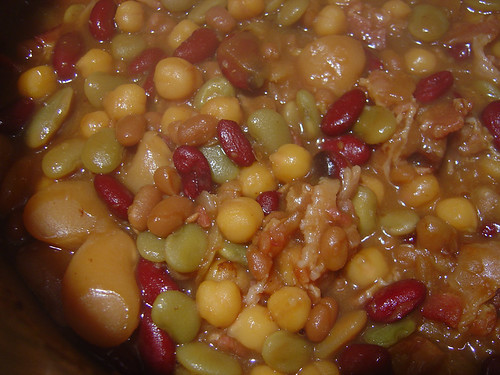
2 cups stuffing, prepared
2 Tbsp olive oil
1 tsp ground mustard
2 tsp salt
1 tsp fresh-ground pepper

DIRECTIONS
Preheat oven to 425
Stuff tenderloin
Drizzle with olive oil
Sprinkle with mustard, and remaining salt and pepper
Cook at 425 for 20-25 minutes, or until meat thermometer reaches 170.

Ok, I cheated a little... stuff tenderloin, that's it? No instructions???

There are a few ways you can accomplish this, 2 works best with a thicker tenderloin with less risk of poking through the side:
1) BUTTERFLY: Arrange tenderloin on a work surface with thinnest end nearest you. Starting at thickest part, make a lengthwise incision down center of tenderloin, cutting two thirds of the way through thickness of meat, adjusting depth of incision as tenderloin tapers, be careful not to cut all the way through. Open tenderloin. Turning knife horizontally, cut tenderloin open on either side like the flaps of a book jacket, being careful not to cut all the way through. Season inside of tenderloin with 1/2 teaspoon each of salt and pepper. Layer stuffing on tenderloin, roll up and secure with toothpicks.

2) HOLE IN CENTER: Make a hole for stuffing that runs lengthwise through pork loin: Beginning in middle of 1 end of roast, insert a sharp long thin knife lengthwise toward center of loin, then repeat at opposite end of loin to complete incision running through middle. Open up incision with your fingers, working from both ends, to create a 1 1/2-inch-wide opening, then pack with all of stuffing, pushing from both ends toward center.

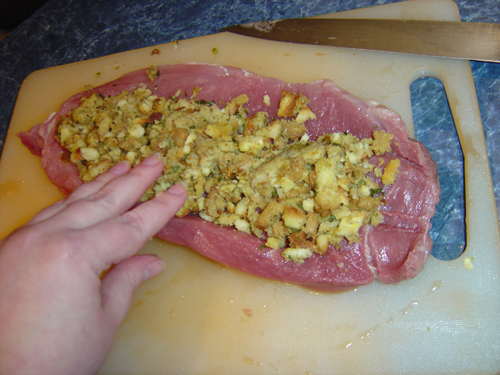
3) ROLL: Arrange tenderloin on a work surface with thinnest end away from you. Starting at thickest part, make a lengthwise incision starting 1/3 of the way down the short side down edge of tenderloin, cutting two thirds of the way through thickness of meat, adjusting depth of incision as tenderloin tapers, be careful not to cut all the way through. Rotate knife 90 degrees and continue to cut into tenderloin until 1/3 through, rotate knife and cut into tenderloin 1/3 through. Unroll tenderloin. Season inside of tenderloin with 1/2 teaspoon each of salt and pepper. Layer stuffing on tenderloin, roll up and secure with toothpicks.

ROLL method
Cuts

Layer Stuffing
Tenderloin Stuffing

Roll and Toothpick
Rolled and Toothpicked

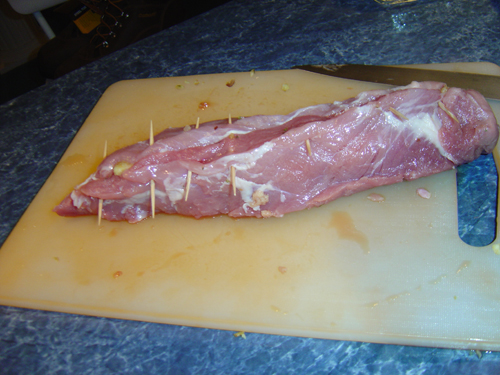
Stuffed and Split Side Down
Stuffed and Split Side down

Tuesday, February 17, 2009

Hola! and Sour Cream Banana Bread

Hi! I'm Becca, as Barbara so kindly introduced me in the last post. I think Barbara and I get along well in the kitchen because we both love things that really aren't good for us (hello chocolate and cream cheese... not necessarily in the same dish) and we are willing to try just about anything. I'm going to start my blogging adventure with an awesome favorite. I got this recipe from a now-defunct stay-at-home-moms' Yahoo group, and it has never failed me. I think the secret to making this a truly moist and perfect quick bread is a stoneware loaf pan. I prefer to use a four-up mini loaf pan - two guesses at the maker! (Barbara and I also share a fondness for kitchen tools - what one of doesn't have, the other does, for sure!) Now that I have folded many loads of laundry, cleaned the kitchen, and baked a batch of this yummy bread, I am allowed to blog!


Sour Cream Banana Bread
1-1/2 cups sugar
1 cup sour cream
1 cup softened butter or margarine
2 smashed bananas
2 tsp vanilla
2 cups flour
1 tsp salt
1 tsp baking soda

In a large bowl, mix sugar, sour cream, and butter/margarine on low for 1 minute.
Add smashed bananas and vanilla. Mix another minute.
Add flour, salt and baking soda. Mix another minute.
You can add a cup of chopped nuts if desired.
Bake for 45-60 minutes at 375. (In my stoneware mini loaf pan, I bake for 45 minutes.) You may want to remove yourself from the house, the smell is irresistible!
This recipe can be multiplied up to 4 times.
Enjoy! No butter required!!

Welcome Becca!

About 6 years ago I had recently moved back to North Dakota and didn't know a soul except my honey's family. In an attempt to pull together my clutter I joined FlyLady, and while I don't really follow her methods anymore I did come away with two things.

The first: you don't have to clean the whole house right now, just spend what little time you do have right now (5, 10 or 15 minutes) and do something.
The second: a friendship with Becca, who I met through the FlyBabies in ND group.

Becca and I have been friends since first meeting in my dining room 6 years ago. We used to live just a few blocks away from each other on the other end of town, and then both moved within a few months of each other a few blocks away again. Totally coincidence, we didn't plan it, but it's been handy. Especially, when we're often the last ones at each others parties as we talk and laugh late in the night.

So, without further delay, I'd like to introduce you to a dear friend of mine, Becca. She is also an avid cook and we share recipes and a love of kitchen gadgets! I'd like to share recipes a little more frequently, but I find it somewhat difficult since most dishes are just thrown together with what I have on hand. Becca will be sharing recipes as well from now on to give you a little more variety. Also, she and I will be getting together once a month to cook and share the recipes and results. I do hope you'll join us.

I'm going to be moving my Menu Planning posts over to this blog as well starting next week and post a new recipe from my previous menu each week.